

Let’s start off this post with a huge disclaimer. In no way am I suggesting or teaching how to steal library books and remove evidence of such criminal acts. This post is solely intended for fellow purchasers of library book sale discards that still have the plastic sleeves on them. Seriously, don’t steal books.
As any of my readers are well aware, I love shopping for used books. Library book sales are excellent resources as you are not only finding some great books at stellar prices, but you are also supporting the local library in their efforts of keeping open and current. I’m constantly amazed at the books I find discarded from the library, but I understand the reasons and gladly give them a loving home. The downside of library book sale finds is that they are most likely encased in plastic sleeves that can be dingy, torn and just plain unattractive. Now, I understand the purpose of those plastic sleeves, but they really aggravate me. For those books that only visit my home for a few weeks from the library, I can withstand the crinkly, slippery and shiny issues of the plastic covers. But when I’ve adopted them to my shelves, I like to see the books each day with their originally intended covers. So for a while now I’ve longed to discover an easy way to free the dust jackets from the plastic and be able to enjoy the books in a much more satisfying tactile way. My research on this however met multiple dead ends. Perhaps no one else cares like I do. Perhaps others don’t mind the plastic casings. But in the off chance that someone else would like to release their library discards, I’m giving you my steps to remove those plastic sleeves and restore the books to their former beauty.
Unfortunately, I have more disclaimers. Although I’ve perfected my method for now, I have not found a foolproof way to do this and every book has a tendency to be a different case depending on the way it was protected. Some are easily removed, and others leave nasty scars on the book’s insides. The dust jackets and covers always survive and look incredible in my opinion, but I am always left with some internal marks. I don’t mind leaving some signs of former library life. I actually really like seeing the old library cards and what cities the book originally circulated. I wholeheartedly wish though that libraries would use a different method of protecting their books without gluing the plastic to the hardcovers! I have excitedly seen a few new library books that either have no dust jacket or it has been removed for library circulation and instead the book just sports the typical spine stickers and internal markings. Makes so much more sense to me.
Soapbox aside, here are my 8 steps to removing those annoying library plastic sleeves from your book sale purchases:
1. Gather your supplies.
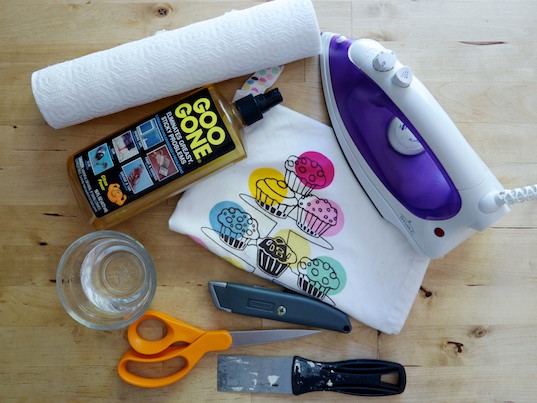
Some books I use everything on, and others I only need a knife and some goop remover. But here is my book surgery list:
- X-acto or box cutter – I love the box cutter as it is easier to wield and I don’t worry about injuring our precious X-acto blades.
- scissors
- goop remover – My preference is for Goo-Gone, although I know there are others.
- paper towels
- scraper – I use an old Spackle knife.
- iron
- thin cotton cloth – to protect the book when ironing
- water + a cleaning solution – I use Mrs. Meyer’s all-purpose.
2. Assess adhesion and cutting needed.
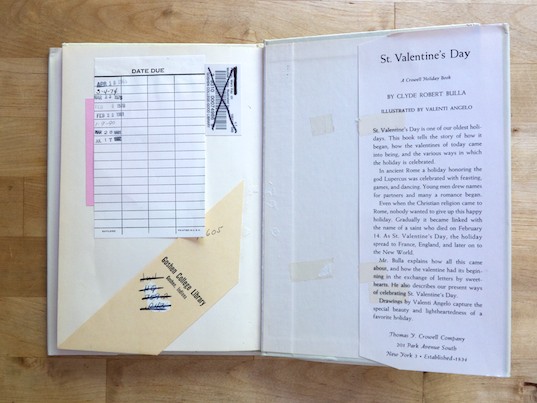
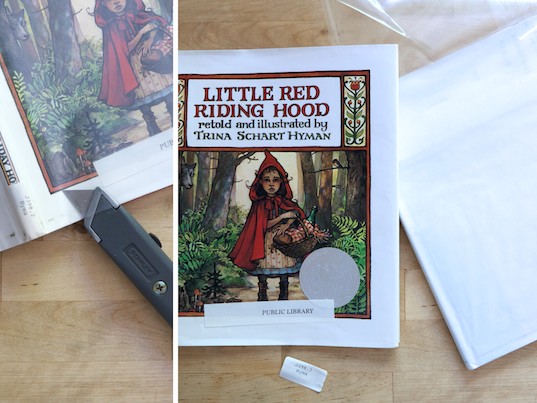
Open the book and gently lift the plastic covered dust jacket edge to see what kind of adhesion is going on. If you are lucky, it will be taped with the old-school Scotch tape my Grandma used to use. That stuff is easy and wonderful, requiring only a gentle swipe of the X-acto for removal. That tape leaves some discoloring, but the job will be quick and painless. See exhibit A on the back flap:
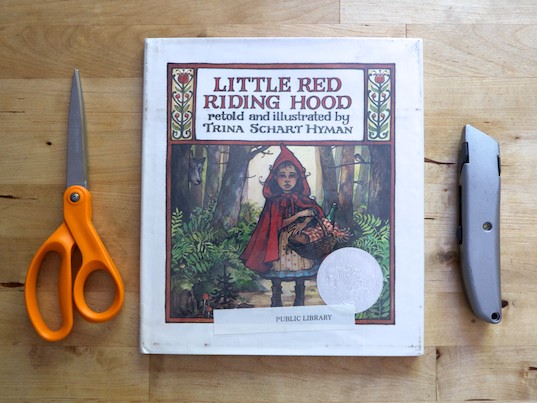
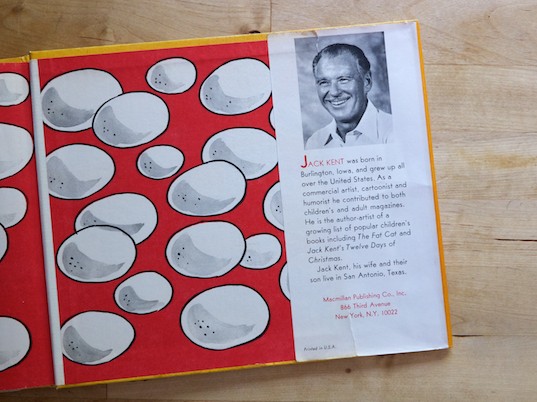
Unfortunately, most are going to be glued down. Depending on the determination of whomever did it, there will be little or lots of glue. My worst case so far, and I still don’t understand why on earth they did this, is this Jack Kent book where they actually glued part of the dust jacket flaps down with the plastic sleeving! I was able to carefully remove the sleeve anyway with my method, but the dust jacket will forever remain attached and slightly torn where normal use has pulled at those glued down portions.
3. Gently slide blade between plastic and dust jacket on top and bottom of both flaps.

At the end of these cuts, the plastic will be separate from the jacket flaps, but the flaps will still be attached via the paper and glue.
4. Slice the plastic away from the dust jacket along the whole bottom edge.
You’ll want to do this carefully and slowly. Some dust jackets are paper thin and will easily get caught in the blade’s edge. Once this is done, the dust jacket will slide out and be completely free. Now you just have to remove the paper and plastic that encases the book.
5. Use scissors to cut as close as possible to where the paper is glued to the cover.
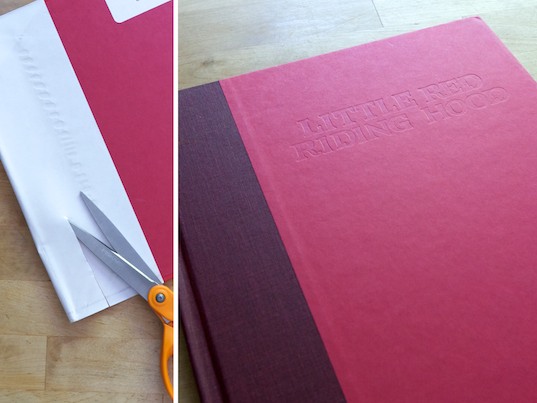
Post these cuts, you’ll likely be rewarded with the beauty of the hardcover. Drink this in before moving on to remove the leftover paper and glue inside.
6. Tear paper gently and iron leftover glue.
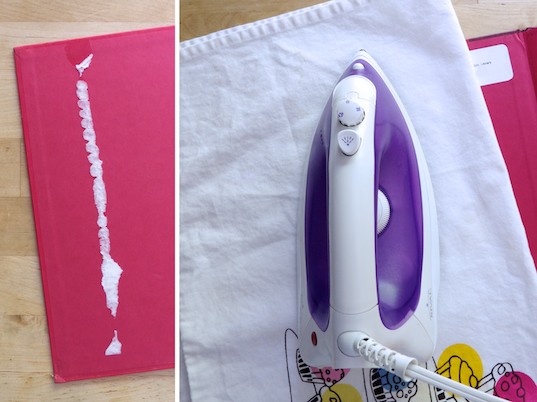
At this point, I carefully tear away as much paper from the glue as I can, until I have a thin strip of the glue and paper remnant. Next, place a thin cotton cloth on top of the book and glue and iron them very slowly. I typically let the iron stay on for a good few seconds to heat the glue as much as possible. Watch it closely so as not to burn the cloth or anything else. After several rounds of heating and gently pulling at the glue, I see how much glue I can peel, scrape and pick away. Use the scraper tool if necessary. How much you remove is totally personal preference. Depending on my patience level, I may leave quite a bit if it is proving difficult to remove, knowing that the newly restored dust jacket is going to cover it anyway. If there is any glue left, be sure to allow it to cool before putting the jacket back on, otherwise it may adhere to the jacket instead!
Here is an example of a near excellent removal. Just a bit of discoloration from the glue strip, but the jacket and cover are lovely.
7. Remove stickers and clean jacket and book, if necessary.
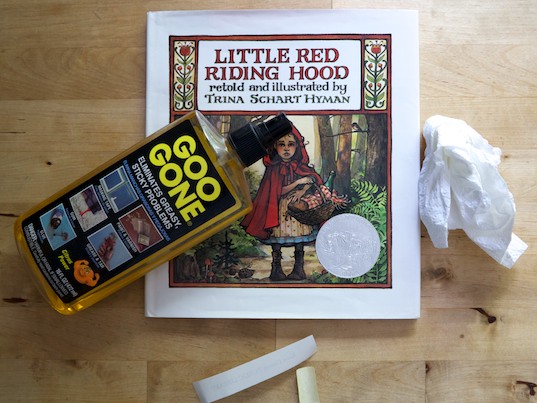
All of my library discards have the spine sticker and often a long label sticker with the branch name on it. On occasion, they just fall right off once the dust jacket is removed from the plastic sleeve. Then I shout hooray! But most of the time it takes a slow process of spraying the stickers with Goo Gone, waiting a few minutes for a good soak, and then picking and peeling the sticker and residue off. This is repeated several times usually until I’m satisfied with the lack of stickiness.
As a final touch, I like to give the dust jacket and sometimes the book itself a gentle swipe with a cloth and a cleaning solution to remove any grime. Little Red was actually very dingy despite the plastic sleeves best efforts, but after some light scrubbing she looks good as new with her shiny Caldecott Honor sticker too.
Also, if I’m feeling particularly picky, I might take an eraser to the inside library cryptic markings normally on the title page.
8. Enjoy the books without their shiny, crinkly plastic sleeves!
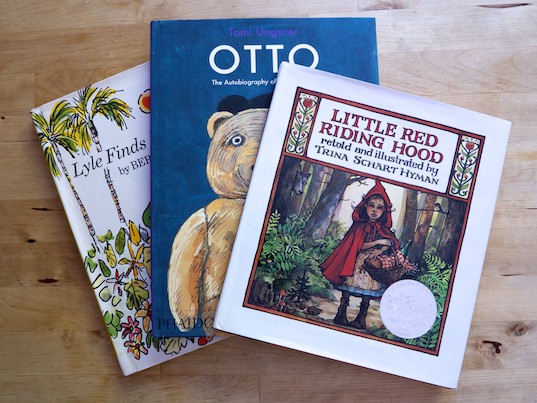
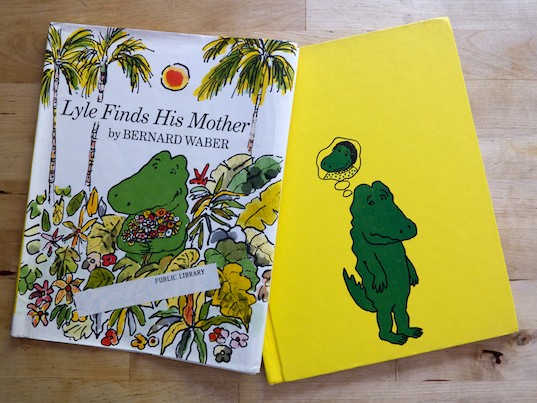
Step back and admire the fruit of your labor. How many you do is up to your stamina and the difficulty of the adhesion. I was able to free about 7 in an hour and a half and then gave it a break for a few days before doing more. But aren’t those books beauties? Especially that Otto with his gloriously uncoated paper stock dust jacket. Lovely.
A very last thought would be to try to recycle all that plastic and the paper that comes with it. I’ll leave the method up to you, but it is worth looking into!
Well, if you made it this far in this incredibly long post, perhaps you care just as much as I do about freeing your books. I hope this was helpful to someone as obsessive as myself. I know I enjoy my library sale finds so much more now. If you try it, let me know how it goes and especially if you discover any of your own tricks. I’m always game to see some post sleeving book pictures too!

I have a few such books I need to “doctor.” I buy a lot of used books, and many come via libraries. Thanks for the tips!
LikeLike
Thanks for the ironing tip. I also use rubbing alcohol to remove stickiness on the hardcovers. You have to be a bit careful as you can remove paint and coloring as well.
LikeLike
omg’sh thanks! that helped me save my book i bought on http://www.Abebooks.com it was a used library book, GREAT condition! (i only payed 3$) and the plastic crap was horrid! the paper dust jacket thing tho came out 🙂
LikeLike
Thank you for the useful tips. I’ve spent the past few days reading through other sites and found these to be the most helpful. Our local library just had a sale and I was able to pick up quite a few books. This weekend will be dedicated to removing the covers. Thank you!
LikeLike
Thank you so much for this tutorial! I love library book sales and my library, but would definitely prefer not to have that shiny plastic stuff on my books. This has been so helpful and now I can doctor my purchases and stare in amazement at the beauty of a owning a hardcover for a great price.
LikeLike
Thanks for the extra tips! I also buy alot of books at library sales (even more now that I am a volunteer of our Friends of the Library chapter). I haven’t removed most of the labels, but for ones that were already removed and left sticky residue behind, I have been using rubbing alcohol–which works well. But good to know other options and if/when I come across more difficult situations.
LikeLike
Thanks so much Caryn! I will be trying this on an edition of Andrew Lang’s Arabian Nights with a beautiful color illustration on the binding under all that plastic. I got this one from abebooks.
LikeLike
[…] If you’re looking to build your library but don’t want to spend like Gatsby then scope out rummage sales, consignment shops, yard sales, and used book stores. All are great ways to hunt down new tomes for your collection, especially pricey ones, for a song. Most libraries have yearly sales as well. Don’t like the library covers and stickers? No worries, they can all be removed. Three Books a Night has a great post on how to do this here http://www.threebooksanight.com/how-tos/remove-library-plastic-sleeves/ […]
LikeLike
Thanks for this! I didn’t have the supplies to carry out your method, but you inspired me to have a go after seeing it could indeed be done, and with a kitchen knife, some time and determination, I managed to remove the plastic sleeve of my soft cover book preowned library book (https://www.bookdepository.com/Blue-Exorcist–Vol–3/9781421540344) and the stickers which were covering up the art on the spine. I bought the rest of the series new/used and the stickers were really bugging me when I displayed them together. Good work on yours, they look a lot better!
LikeLike